
Subsurface-mobile User Manual
Manual authors: Willem Ferguson, Dirk Hohndel
Version 3.4, October 2021
Welcome to Subsurface-mobile, the mobile version of Subsurface, advanced dive logging software with extensive infrastructure to display, organize, and interpret scuba and free dives. Subsurface runs on Windows, macOS, most common distributions of Linux. Subsurface-mobile is available for Android and iOS. Both are open-source software (in simple terms that means that there is no commercial interest behind them, all the source code needed to build them is available, there are no ads, no one is monetizing your data, etc).
Subsurface-mobile is a limited mobile version of the desktop software Subsurface, aimed at Android and iOS smartphone and tablet devices. While the desktop version of Subsurface shows much more detailed information for each dive, the mobile version allows a more accessible dive log on the go. For example, you can prove dive experience on a dive trip to dive shops or review previous dives while on a dive boat. Assuming you have a dive computer that is supported by the mobile OS of your choice, Subsurface-mobile supports the downloading of dives from your dive computer.
Users of Subsurface-mobile often use the mobile app together with the desktop version of Subsurface, sharing dive information between the mobile and the desktop versions using a free Subsurface Cloud account. However Subsurface-mobile is a fully fledged application in its own right that can also be used independently of the desktop version with or without the use of cloud storage. Subsurface-mobile allows:
-
Download and storage of dive log information using the Subsurface cloud.
-
Viewing this information on a mobile device.
-
Manually creating and adding new dive records to your dive log.
-
Download dive data directly from some dive computers.
-
Editing most of the dive log data, e.g. dive-master, buddy, equipment or notes relating to a dive.
-
Viewing the localities of recorded GPS positions and of dives on a map.
These items are discussed in greater detail below.
Subsurface-mobile has some limitations compared to Subsurface:
-
Only a subset of the dive computers supported for download by the desktop version work with Subsurface-mobile, this being determined by hardware and OS limitations in the two mobile platforms. On Android, a subset of dive computers that use USB serial cables or a Bluetooth / Bluetooth LE interface are accessible. On iOS, only Bluetooth LE based dive computers are supported.
-
No dive planner.
-
No printing.
-
No support for media embedded in dive profiles (Subsurface allows access to images and video clips directly from the dive profile).
1. Installing Subsurface-mobile on your mobile device
Find Subsurface-mobile in the Google Play Store or the Apple App Store and install it. For Android devices without access to the Google Play Store, APKs can be found in the downloads folder on the Subsurface website.
2. Getting Support
The best place to get support is the Subsurface User Forum. Additionally, Subsurface-mobile allows you to send a support request by tapping on Ask for support in the Help menu. This will open an email to our in-app-support address in the native email client, including the relevant logs.
3. User Interface
Subsurface-mobile uses the same user interface philosophy on both Android and iOS, based on an open source project called Kirigami, maintained by the KDE/Plasma development community. It has a slightly different look and feel than many native Android and iOS apps, but we find it easy and intuitive to work with.
You have access to the Main menu through a Hamburger button (three short horizontal lines) in the lower left corner of the screen. Additionally, the Main menu can be opened by swiping towards the right from the very left edge of the screen. In addition, many screens have a Context menu available through a button with three vertical dots in the lower right corner and that can be opened by tapping and holding a dive or trip header in the dive list.

At the bottom of many Subsurface-mobile screens is a round Action button that provides quick access to the most commonly needed actions on that screen (see image on the left). Some screens have only the round central button, others have one or two additional actions on either side of the central button.
On Android devices, use the Android Back button for "cancel", "discard" or "back" actions. For example, when editing dive information, tapping the action button saves the changes while the Android back button can be used to cancel the edit without saving changes.
The image below indicates some of the important features of the menu system. On the left is the main menu, activated as described above. On the right of the image are the sub-menus.
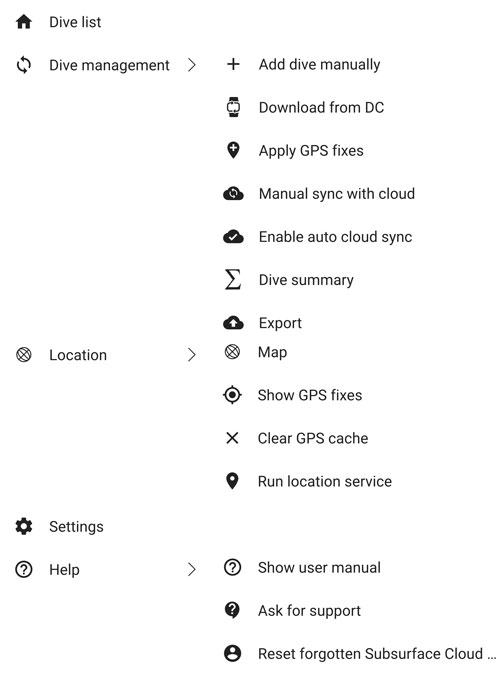
All screenshots in this user manual are currently from the Android version. The iOS screens look similar.
4. Using Subsurface-mobile for the first time
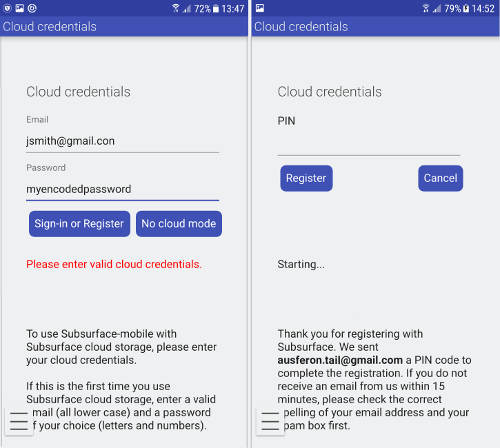
When you start Subsurface-mobile for the first time, a Subsurface splash screen is shown while the program loads. On some devices this may take several seconds. Afterwards the Cloud Credentials screen appears (see left image below).
4.1. Using Subsurface-mobile without Cloud Storage
Tap the "No cloud mode" button. The app will only store dive log information locally on your device. Following installation an empty dive log is created.
4.2. Using Cloud Storage
The Subsurface maintainer provides a dedicated and free Internet cloud storage account for users of Subsurface and Subsurface-mobile. You can use this to store your dive log and to share your data between several computers and devices. The Subsurface team never accesses your dive data without explicit permission to do so, the data are not used for any other purpose than providing them to the user who created them. There are no ads and no harvesting / analysis of the data / monetization of data on the Subsurface Cloud storage.
Subsurface-mobile is sufficient to fully maintain a dive log. In addition you can use the more advanced features in Subsurface when you have access to a computer while still being able to work with your dive data when only a mobile device is available.
The dive data in the cloud are cached locally on any device or computer that is connected to the Subsurface Cloud account. It is easy to create backups of the data (for example in XML format) on the desktop: both the mobile device and the desktop keep a local copy of the data so that the dive log is always accessible, even without an Internet connection.
To create a Subsurface Cloud account follow these steps:
1) Enter an e-mail address and a password in the fields indicated on the screen (see image above). The e-mail address should be in lower case and the password should contain a combination of upper and lower case letters and/or numbers.
2) Tap the "Sign-in or Register" button.
If you have already set up an account on a different computer or device, simply enter the same credentials here. Subsurface-mobile will now download your existing dive log data. Once the dive list has been downloaded from the cloud, Subsurface-mobile usually works only with the the local copy on the mobile device. This avoids long delays or even failure of operations if there is poor internet connectivity. Remember to manually sync with the server after making local changes (either by pulling down on the dive list, or by using the manual sync entry in the Dive management menu entry).
3) If this is a new cloud account, a PIN screen will open (see right image above). A PIN is e-mailed to the email address entered in the previous step. Enter this PIN into the field indicated and tap the Register button. After the PIN has been entered it is no longer needed - it just proves that this is indeed your email account.
A video-tutorial is available that demonstrates how to connect to the cloud.
At this point a new account has been created for you on the cloud server and access to the cloud is enabled. In this case the dive list is initially empty. Start entering dives in the dive log or download dive information from a supported dive computer.
Once registered, Subsurface-mobile remembers the cloud credentials and it is not necessary to provide these again when launching the program.
|
|
Cloud problems: FAQ |
After filling in the correct information and submitting it, I did not receive a PIN by email
-
Check carefully for spelling mistakes in the email address you provided. This is a common problem since autocorrect often mangles email addresses.
-
Check that the return email containing the PIN is not in the SPAM/Junk folder of your email client.
-
Wait for a few hours and check again for an email with a PIN.
-
If there is still no email containing a PIN, send mail to in-app-support@subsurface-divelog.org
I want to access the Subsurface Cloud storage but I have forgotten my password. How can I reset my password?
The Help menu has an option Reset forgotten Subsurface Cloud password. Use that or go to the password reset website
Simply enter the same email address that you used during cloud registration and follow the indicated steps. To prevent abuse of this system a confirmation email will be sent to your account.
The dive log can be updated automatically. If there is Internet connectivity, Subsurface-mobile accesses the cloud-based dive log to verify that the local copy of the dive log is still the same as the log in the cloud server. If not, the local copy and the copy on the server are synchronized.
5. The Dive List
The Dive List is the heart of Subsurface-mobile because most of the actions center around the dives on the dive list. While the dive list is loading from the cloud, a message appears at the bottom of the screen, indicating that the cloud is being accessed, after which the dive list is shown. Once the list is loaded you can scroll up and down through your dive history.
The Dive List consists of two types of entries:
-
Trip headers. A trip header is a line describing the year and month during which a dive trip took place, as well as the geographical area of the trip. The second line in the lefthand image below indicates that a 10-dive trip was made to Guinjata, Moçambique during December 2016.
-
Individual dive records. Tapping a trip header expands the dive list to show (or hide) the individual dives performed during the trip. Each dive is represented by a dive record. By default the dives during the last trip are listed with older dives at the bottom and recent dives at the top of the list. In the lefthand image below the last dive during the Guinjata trip was in the Inhambane Estuary.
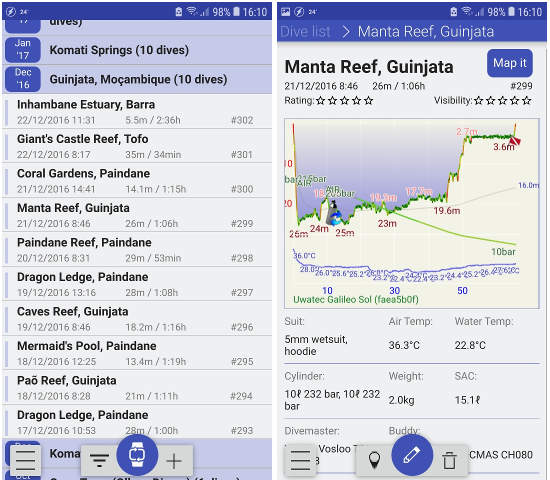
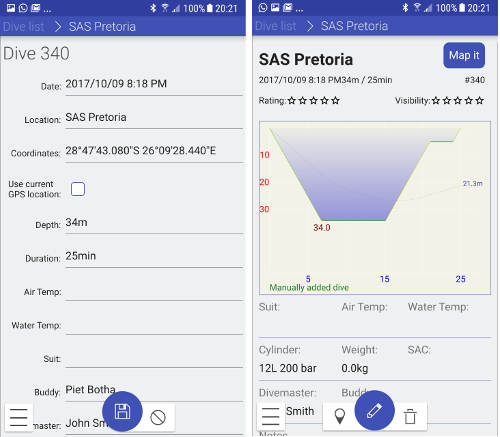
5.1. View a dive: the Details view
When you tap on a dive in the Dive List, a Dive Details page with the dive profile and many important details about the dive is opened (image on right above). You can use a pinch gesture to zoom into the profile. Tapping and holding with one finger (until the profile becomes translucent) allows you to pan the profile and see more details in specific parts of the profile.
You can view other dives by swiping the Details view to the right (for the previous dive) or to the left (next dive). Using the Action Bar, it is also possible to delete the dive (tap the Trash Icon on the Action Bar) or to view the dive location on an integrated map viewer.
The context menu (accessible by tapping on the vertical three dots in the lower right corner of the screen) offers additional options to move dives between trips, the same delete and map options already mentioned, and access to the undo and redo facility that allows you to step backwards and forwards through recent changes.
5.2. Viewing the location of a dive on a map
In the Details View, you can either tap the name of a dive site or the GPS pin on the left hand side of the Action Button at the bottom of the screen in order to open a map with the dive site in an integrated map viewer. This of course is only possible if the dive site is associated with GPS information.
5.3. Filter the dive list
By default, all the dives in the dive log are shown in the dive list. After several years your dive log can become quite long and, sometimes, you might like to list only the dives of a particular type, e.g. those at a particular dive site or those with a specific buddy or dive master. Use the Filter to achieve this. The filter mechanism searches through all the information for each dive, looking for one or more key words. Only the dives containing these key words are listed in the dive list. To Filter the dive list, tap the Filter action button:

at the bottom of the dive list. A text box appears at the top of the screen (image below). Type the word(s) that you would like to use as a filter.
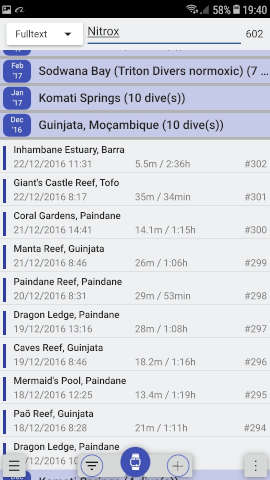
Three filter modes exist. "Fulltext" searches all text strings. Selecting "People" lists buddies and dive masters, while "Tags" only filters for tags containing the given text. Filters are not case-sensitive. To clear the filter, remove the key words from the text box and select the Filter action button to switch off filtering. The image above represents a full-text search for dives with the word "nitrox".
6. Dive List Management and adding dive information
6.1. Manually adding a new dive to the dive list
This video-tutorial explains how to add information to a manually-entered dive.
You can manually add a dive to the existing dive list. On the dive list tap the "plus" sign in the action bar, or use the main menu and tap Dive management → Add dive manually. This opens a screen that is identical to the editing screen discussed above. When a dive is added manually, you cannot directly add a dive profile from a dive computer. However, if you do not use a dive computer, the duration, depth and several other bits of information about the new dive can be entered. The Action button at the bottom of the screen contains a disk symbol. Tap this to save the new dive. To cancel any edits, tap the Back button. The left-hand image below shows a screenshot of a dive being created and the right-hand image shows the same dive in Details View. After editing the dive information, the dive trip information needs to be edited as described in the section above on Dive trip editing.
6.2. Download dives from a dive computer
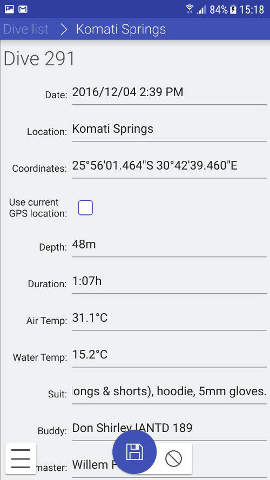
There are several ways to get to the Download Page. You can either tap on the main Action Button on the bottom of the Dive List, or you can select Dive management → Download from DC in the main menu. On Android devices, when you plug in a USB serial cable for a dive computer, the Download Page will be opened automatically. A screen is shown requiring that the user specify the names of the vendor and model of the dive computer. For instance, when using a Shearwater Petrel dive computer, the vendor is Shearwater and the Dive computer name is Petrel (see image on the left, below). Caveats: The download feature in smartphones supports only a limited number of dive computers. On Android devices these are typically dive computers using a serial USB interface using a USB OTG cable or a simple USB C-A adapter on newer devices. Android devices also support Bluetooth dive computers that are supported in Subsurface on the desktop. Both Android and iOS devices allow direct download of dive data from a handful of Bluetooth LE enabled dive computers. Use the Vendor name and Dive Computer drop-downs to pick the correct dive computer. When downloading from multiple different dive computers, shortcut buttons appear below the drop-downs to easily switch between them. In the Settings menu you can remove these buttons, a useful feature for removing buttons of dive computers that are not used any more. Achieve this by selecting the option Forget remembered dive computers in the Settings menu. After all these caveats, let us proceed with download.
TODO: image of DL missing - or link to the 7.2.3 Start the download
When downloading from multiple different dive computers, shortcut buttons appear below the drop-downs to easily switch between them. In the Settings menu you can remove these buttons, a useful feature for removing buttons of dive computers that you do not use any more. Achieve this by selecting the option Forget remembered dive computers in the Settings menu.
6.2.1. Download from USB serial dive computers
This feature is not supported on iOS.
|
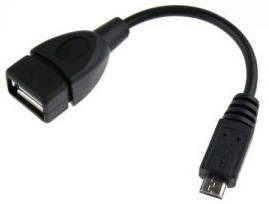
Most current Android devices now have a USB Type C port and come with a simple A-to-C adapter plug, which lets you plug in the dive computer cable into the phone or tablet. For older Android devices with micro USB connector you will need to plug the USB cable used with the dive computer into a USB OTG cable which, in turn, plugs into the micro-USB port. The OTG cable usually has a full-size ("Type A") female receptacle at one end which accommodates the full-sized male plug of the dive computer USB cable (see image on left). This means that two cables are used to connect the dive computer to the mobile device. Not all Android devices support OTG cables but usually all modern Android devices with a USB C plug can be used with a USB A-to-C adapter. |
Subsurface-mobile remembers the settings for dive computers that have been successfully used (image on right, below). These appear as buttons under a heading "Previously used dive computers". Select the appropriate button. Having connected the USB dive computer to the Subsurface computer and having selected the appropriate vendor and dive computer, ensure that the Connection text box shows the corresponding connection. For a small number of dive computers the connection name shows the dive computer vendor, for most only the cable chipset vendor (and USB connection number) is shown. Most users only connect one USB dive computer to their Android device and then things are fairly straightforward. A dialog appears asking if you want to use Subsurface-mobile to connect to the device. If you confirm, then Subsurface-mobile opens the dive computer download screen with the correct connection selected (and if it can deduce the correct dive computer based on the cable used, even that information is already pre-filled).
6.2.2. Download from Bluetooth and Bluetooth LE dive computers
This video-tutorial demonstrates downloading dives from a Bluetooth-equipped dive computer.
The process for Bluetooth download differs between Android and iOS. In iOS the best results are obtained when the dive computer was in Bluetooth LE mode before Subsurface-mobile is started. On most dive computers this is done through a menu entry, others (e.g. Suunto) always respond to Bluetooth LE requests.
In contrast, for Bluetooth-equipped dive computers and Android devices, first establish a Bluetooth connection between the dive computer and the mobile device using Android system tools to achieve pairing. For many Android devices, the Settings → Bluetooth tool of Android is probably appropriate. Subsurface-mobile performs communication using both Bluetooth and Bluetooth LE (BLE). The best choice of Bluetooth communication is often made by the software and the user need not be concerned with this. For dive computers with both Bluetooth and BLE, a separate dive computer button is presented on the download screen for each mode of communication, allowing a choice. Use the Connection value to distinguish between the two options. In the image on the right, below, there are three buttons labeled "Shearwater Petrel 2". These represent two Shearwater Petrel dive computers, one of which can communicate in both Bluetooth as well as BLE. The Connection information in the image below indicates that the Petrel with no BLE is selected. For Bluetooth LE dive computers, the Connection value has an "LE" prefix.
This video-tutorial demonstrates setting up a Bluetooth connection with an Android device.
6.2.3. Start the download
With communication between dive computer and Subsurface-mobile having been set up, tap the Download button. Be patient because the download can take a while - with many long dives and a slow Bluetooth LE connection we have seen download times of 45 minutes or longer. But usually downloading a day’s worth of diving happens reasonably quickly. The downloaded dives appear in the bottom part of the screen, the most recent dive at the top (see right image below).
Each dive has a check-box on the left hand side, used for selecting which dives you want to add to the Subsurface-mobile dive list: dives that are not checked are ignored. Once you have picked the dives you want to add to the dive list, tap the button at the bottom left labeled Accept. The selected dives will now appear as part of the Subsurface-mobile dive list.

6.3. Edit the dive information
This video-tutorial explains how to add information about a dive.
At the bottom of the Dive Details screen the action button is a pencil. Tapping the pencil button changes the page and enables edit boxes that allow modifying the existing dive information, e.g. adding text to the dive notes or changing the names or values of some of the information (see image above). It may be necessary to scroll the window to access all the information. At the bottom of the edit screen is a Save action button. Tap this to save the new information, after which the dive list screen is updated and shown. To cancel any edits, tap the Android Back Button or the application back button at the top left of the screen on iOS.
7. Edit the dive trip information
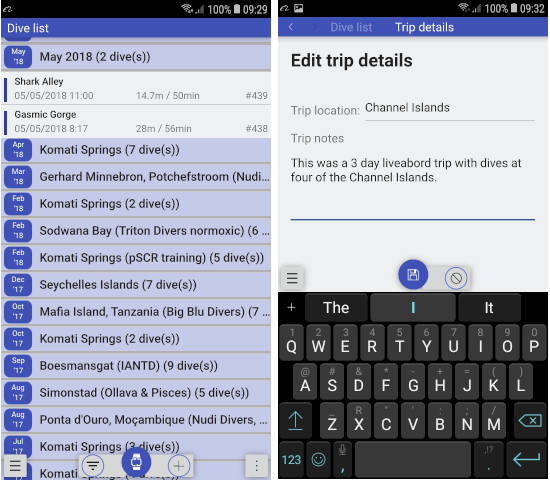
When a new dive(s) is entered manually or downloaded from dive computer, a trip header is created at the top of the dive list only showing the month and the year of the dive trip as well as the number of dives during the trip (image on left below, showing a trip header with "May 2018", the trip comprising two dives). You would probably like to include information about the place where the trip took place, e.g. "Channel Islands" or the dive charter company used. In this case long-press the dive trip header to activate the context menu. Select the option "Edit trip details" to open a panel for typing information about the trip (image on right, below). Having provided the required information, tap the Save action button at the bottom of the screen. This returns you to the dive list, showing some of the dive trip information that has just been provided.
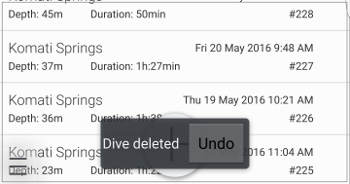
7.1. Deleting a dive
Delete a dive from the dive list by long-pressing a dive and selecting delete in the context menu. If the wrong dive was deleted by mistake you can easily undo the operation by using the context menu.
8. Interacting with the cloud storage
8.1. Manually sync the dive log with the Subsurface Cloud
As the name indicates, this ensures that the local changes on the mobile device and changes made by other devices and computers to the data stored in the Subsurface Cloud are synchronized. It is highly recommended to sync with cloud storage after downloading new dives from a dive computer or after manually adding or editing dive information on the mobile device. This can also be triggered by pulling down (and briefly holding) the topmost entry of the Dive List.
8.2. Enable cloud auto sync
By default Subsurface-mobile runs offline and only syncs the dive list with cloud storage when explicitly told to do so (see the previous entry above). You can choose to always sync with the cloud server. This is not recommended unless you are in an area with a fast and reliable Internet connection, as otherwise Subsurface-mobile might appear to hang between operations as it tries to connect to the cloud server. Selecting Enable cloud auto sync causes the local dive log to be synchronized with the copy in the cloud after most changes as well as (on Android) every time that Subsurface-mobile is closed. iOS doesn’t support the concept of closing an app (you can just kill it, which doesn’t allow for a final sync with the cloud). In general it is safer to manually sync with the cloud once you are done making changes in Subsurface-mobile.
9. Dive Summary
The Dive Summary page provides a very simple overview of your diving activities - which can for example be useful when documenting total dive experience and recent dive activity for a dive center at the beginning of a dive trip.
The summary page lists the date of your first dive in the dive list as well as your most recent dive. It also provides two columns of data for selectable time ranges (by default all dives in the dive list and the dives during the last six months.
10. Dive Statistics
|
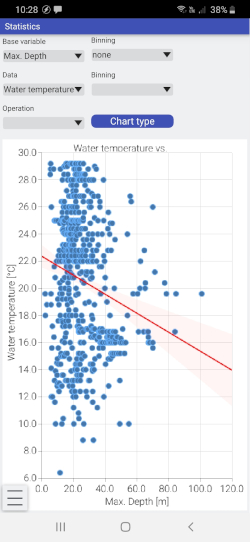
Creating meaningful statistics that convey the information you are looking for is surprisingly hard. Different users have very different needs and very different expectations. Subsurface-Mobile provides a rather detailed set of statistics features to summarize information from the dive log in a graphical way. To access the dive statistics tool, select Main Menu → Statistics. The statistics tool is so flexible that it is impossible to cover every possible use case. Rather, we provide a conceptual introduction, followed by specific examples. The tool can be closed using the Back button (bottom right in Android). The Statistics tool has two panels (image on left): 1. A setup panel containing comboboxes for requesting a graph (top). 2. The graph that has been requested (bottom). |
A diver’s introduction to statistical graphs
|
|
The extreme flexibility of the Statistics tool means that you need to provide detailed information about what information Subsurface should provide. It helps to have a clear objective, i.e. a solid understanding of what you want Subsurface to show you. In other words, you need to formulate the correct question. There are so many graphical display options that, if you do not formulate the question correctly, the information is unlikely to be presented in a valid or appropriate way. Because all statistical results in Subsurface are shown as graphs, formulating an appropriate specification requires four steps: |
a) Which dives do you wish to graph? If required, use the Filter button for selecting specific dives to be analyzed.
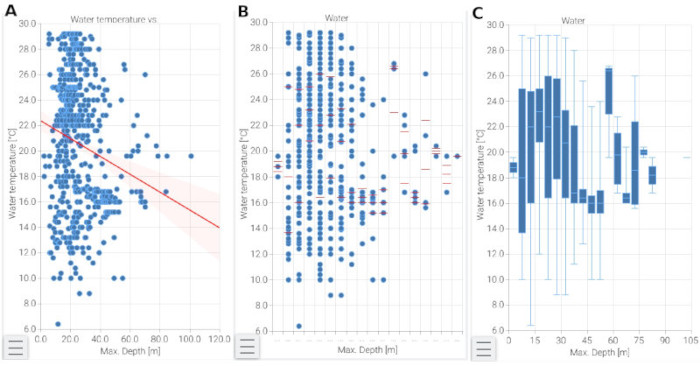
b) Which variable should be displayed along the bottom horizontal axis of the graph? Let’s say you wish to see how many dives you performed each year. In this case the variable along the bottom horizontal axis would be "Year". Alternatively, if you wished to compare the mean depth of your dives using different suit types, then "Suit type" would be selected as the variable for the bottom horizontal axis. Alternatively, if you wished to visualize the water temperature for dives of different dive depths, then you would select "Max. depth" as the variable on the horizontal axis (see image below). The variable along the horizontal axis is also called the "base variable", the "X-axis variable" or the "independent variable": it defines the basic units or categories used for analysis.
c) Which variable should be displayed along the left-hand vertical axis of the graph? This is the variable that you are primarily interested in. In some cases this could just be a count such as "No. of dives". However, if you are interested in water temperature at different dive depths, you would select "Water temperature" as the variable along the vertical axis (see image above). In this case you are primarily interested in water temperature, not in dive depth (which would be the variable along the horizontal axis). The variable along the vertical axis is also called the "data variable" or the "dependent variable": it is the variable affected by (or dependent on) the values of the variable along the horizontal axis, as in the graph above.
NB: Since, in Subsurface-Mobile, the graphs can be rotated to be horizontally-oriented or vertically oriented, the terms "horizontal axis variable" and "vertical axis variable" are not appropriate. We use the term Base variable to denote the conventional horizontal axis variable and the Data variable to denote the conventional vertical axis variable.
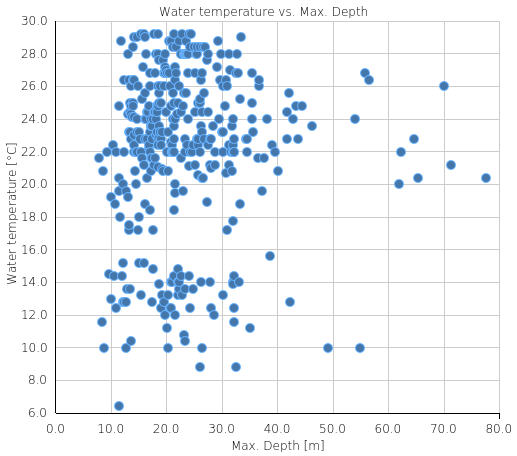
d) Which chart type do you require? By default Subsurface selects the most appropriate graph type, but this is a user-selectable option. Taking the example of water temperature at various depths above, the image below shows three of the possible chart types of the same data: Image A shows the raw data by plotting the exact temperature and depth for each dive. Image B, however, groups the dives in 5m depth intervals within which the temperature for each dive is indicated (the red marks are explained below). Image C also groups the dives in 5m depth intervals. However, in this case the minimum, maximum, mean, upper quartile and lower quartile are shown for each depth class.
The point of the discussion above is to show that, before initiating a graph, you need to think carefully about what you want Subsurface to show, at least keeping the above four aspects in consideration.
A more technical note on the valid use of statistical graphs
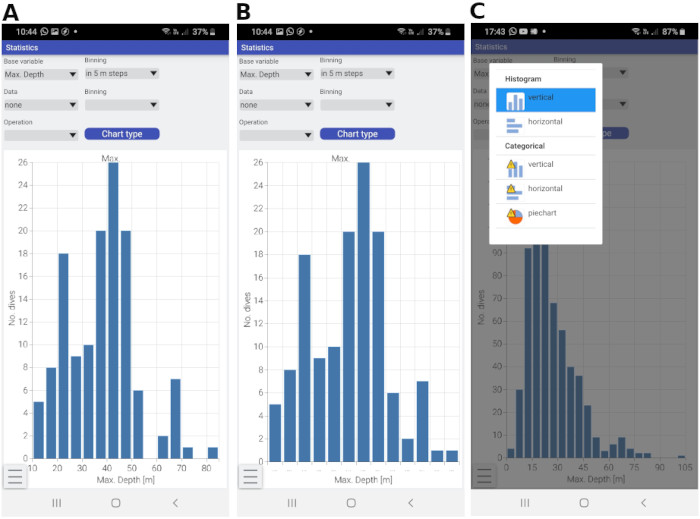
When graphing variables from a dive log, there is an important distinction between continuous variables and categorical variables. These two data types are typically graphed in different ways. A continuous variable can theoretically have any value. For instance dive depth can have any value greater than zero (theoretically negative depths indicate height above the water but this is not a practical possibility). Consequently, depths of 21.63857 meters or 44.7653 feet are entirely realistic. Dates are also continuous since the annual value of any particular instant in time can be presented. For instance a dive at 12 noon on April 1st 2020 can be presented by a value of 2020.24726 (90.5/366 days in that leap year). On the other hand dive mode is a categorical variable: there are no values between "Freedive" and "Open circuit" or between "Open Circuit" and "CCR". Other categorical variables include Buddy, Visibility, Rating and Suit type. Different methods are used to represent these two types of variables, evident from the way in which the axes are organized. It is perfectly valid to create a graph with a continuous Base variable and a categorical Data variable and vice versa. However, when using a continuous Base variable, use a histogram, NOT a bar-chart. The images below show counts of dives at different depths. Image A is a histogram showing that no dives were conducted between 55m and 60m depth. However two dives were performed between 60m and 65m: these two bars (55-60m and 60-65m) have equally important information. Image B shows the bar-chart of the same dataset where depth has been converted to a categorical type. Notice that the two bars with no dives (55-60m and 75-80m) are omitted. Important information is lost because of the use of a bar-chart to represent continuous data. It is easy to determine whether a specific graph is a barchart or a histogram: when selecting "Chart type" the heading of the submenu should show either Barchart or Categorical in the case of categorical variables, and histogram or scattergraph in the case of continuous variables. Subsurface-Mobile helps by showing a yellow triangle for graph types likely to be inappropriate (Image C).
10.1. Graph orientation
In many cases the values of the Base Variable along the horizontal axis are shown by dots, not numbers or names (Image B above). This is because the screen of a mobile device often is not wide enough to show all the values, especially prevalent in bar charts where the labels along the bottom axis are long. There are two ways of addressing this problem:
-
Turn the mobile device through 90 degrees so that the screen display is in landscape (wide) mode.
-
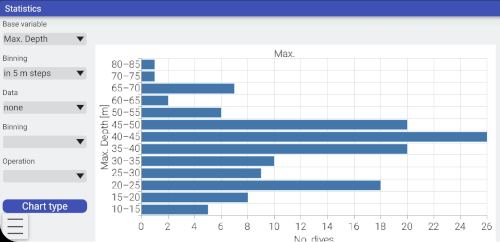
Rotate the bar chart through 90 degrees by selecting a horizontal bar chart (in the Chart type combobox, select a horizontal chart type). In this case the bars are shown horizontally in both portrait and landscape orientation. For instance, the image below shows the horizontal bar-chart produced when selecting "Categorical/Horizontal" in the Chart type combobox and using the same dataset as in graph B in the image above. With the axes rotated there is much more horizontal space for showing the relatively long label for each bar in the chart.
10.2. Graphs of counts data
By default, when the Statistics panel is opened, a histogram is shown of the number of dives performed each year. This is an example of counts data. To request a graph representing counts, three comboboxes need to be set:
a) The top left combobox of the Base variable needs to be specified. Which variable should be along the horizontal axis? Examples are Year, Buddy, Rating, Max. depth.
b) The binning combobox (top right) for the Base variable needs to be specified. This represents the increment for each bar along the horizontal axis. For instance, when counts of number of dives are extracted for years, this could be in increments of a year, a quarter (3 month period) or a month. For some variables, e.g. Buddy or Rating, a binning value is not relevant and cannot be selected. However, for others, e.g. Year or Max. depth, selecting the appropriate binning is important.
c) For simple counts data, the left combobox of the Data variable needs to be set to "none". This is because a data variable is not involved in this type of graph. Divers used to spreadsheets may prefer a pie chart for these data, achieved by selecting "piechart" from the Chart type combobox. It is possible to simultaneously provide counts for two variables. In this case one could specify a Data variable which results in the counts being subdivided according to the data variable. This option does not have a piechart equivalent.
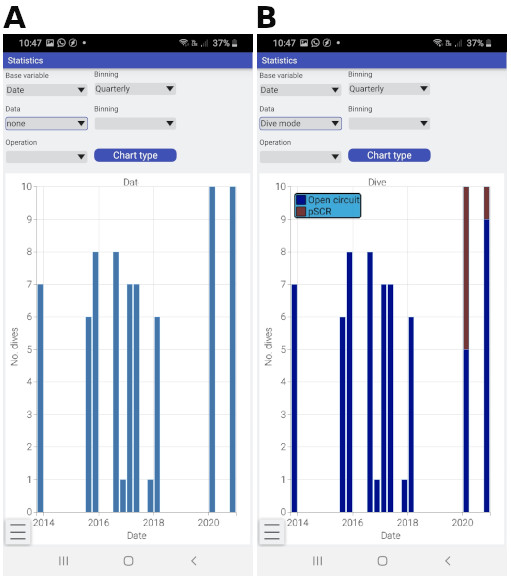
For simple histograms, the default height of each bar is determined by the mean value for the observations included in each bar. However, this can be manipulated using the Operation combobox to show the mean, maximum, minimum, median and sum applicable to each bar. Image A below shows quarterly count data of dives while image B shows quarterly count data, subdivided by dive mode (some dives open circuit, other dives rebreather). The legend can be dragged around so that it does not obscure part of the graph.
10.3. Counts comprising more than one category in a bar
As mentioned in the section above, bar-charts showing a breakdown of each category for a number of subcategories are easily created.
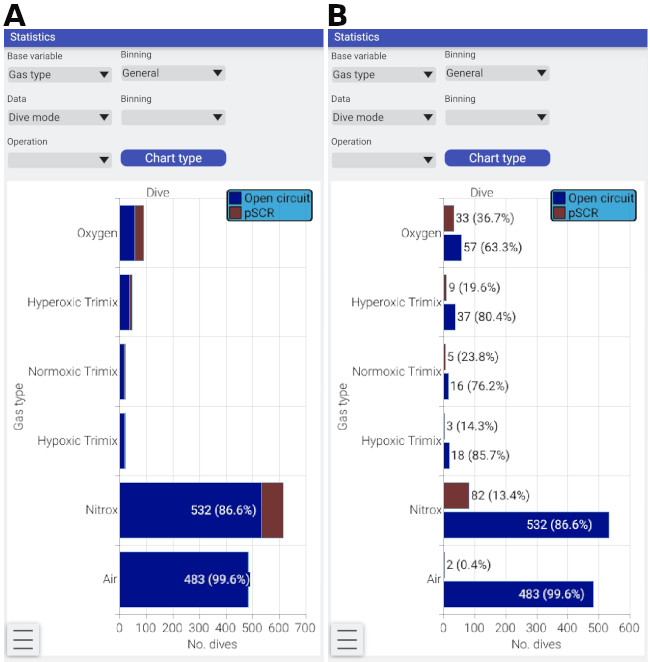
a) Select a variable with categories (along the horizontal axis) as a Base variable (e.g. dive mode or suite type).
b) Select another category of data as a Data variable (e.g. gas type or cylinder type).
The images below show two alternative bar-chart representations. If, in the Chart type combobox, one selects "Barchart/stacked vertical", a graph similar to image A below is generated, summarizing a log of technical dives where, for each cylinder gas type, the bar is subdivided into a count for open-circuit dives and for rebreather dives. On the other hand, if "Barchart/grouped horizontal" is selected in the Chart type combobox, a graph similar to image B, below, is produced. Here the subdivision within each gas type is shown as adjacent bars.
10.4. Scattergraphs
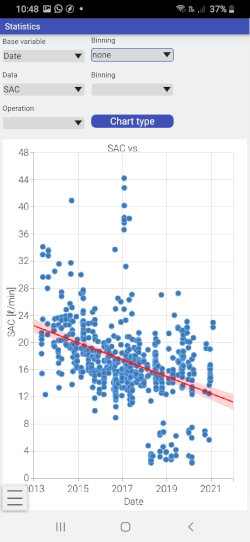
|
Sometimes you might wish to investigate the relationship between two dive variables. Has my SAC rate decreased over the years? Is the water temperature colder at greater dive depth? One of the ways of investigating these questions is to draw a scattergraph where the values of one variable is plotted against the other variable (see image on the left). |
For the dataset in the image above the SAC rate appears to have decreased over time. If the relationship between the two variables is statistically significant, a red line is shown that summarizes the best estimate of the relationship between SAC rate and year. In this graph it appears that SAC rate has decreased from around 21 l/min to around 14 l/min between 2013 and 2021. The pink area around the red line indicates the uncertainty of the precise orientation of the line. The line is expected to lie somewhere within the pink area with a certainty of 95%. The intensity of the pink color also indicates the relative reliability of these estimates. The procedure for obtaining a scattergrapth is:
a) Specify the Base variable: Which variable should be along the horizontal axis? Examples are Date, Temperature, Max. depth, SAC rate.
b) Set the binning value for the Base variable (top right) to "none".
c) Specify the Data variable: Which variable should be along the vertical axis?
10.5. Comparisons between categories of dives
You might wish to compare different categories of dives. Is the (5-star) Rating of a dive related to water temperature? Is my SAC rate related to diving with different dive suits? Since dive suit and Rating are categories, a scattergraph is not appropriate. The default is a categorical dot graph, which, in the case of image A below, shows the precise water temperatures for each Rating. The red lines indicate the top quartile, the mean and the lower quartile of temperature for each rating. The column with no star indicates dives for which a Rating has not been selected. It appears that dives with a 5-star rating have higher temperatures than the other ratings. To obtain a categorical graph:
a) Select a variable with categories (along the horizontal axis) as a Base variable (Top left).
b) Select the data variable and set binning to "none" (middle right combobox).
c) By default the Chart type combobox shows "Categorical/data points". If this is not the case, select this value.
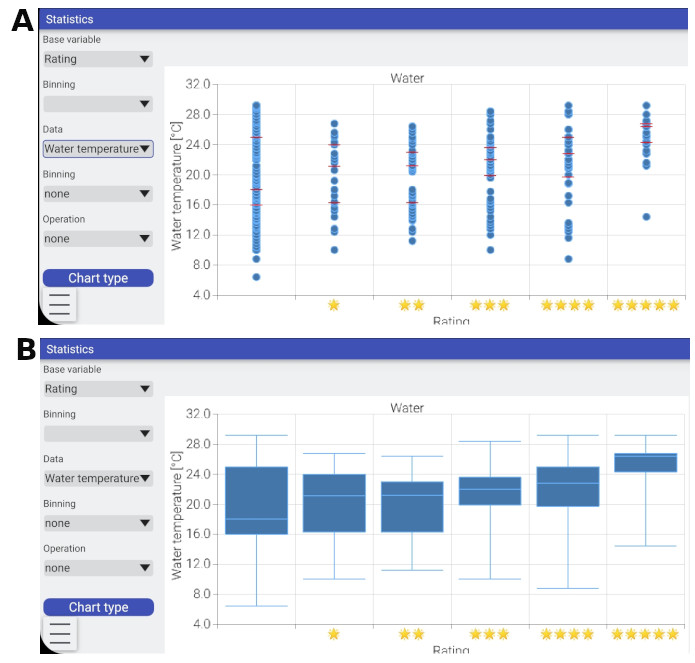
Alternatively you could create a Box-whisker graph for the same data. In the Chart type combobox, select Categorical/"box-whisker". This creates a graph indicating the maximum, top quartile (Q3), median, bottom quartile (Q1) and minimum for each category or class. Image B above shows a box-whisker graph for the same data as image A above. You can see that the values for a Rating of 5 stars tend to be higher than for other ratings.
11. Export
The Export feature is somewhat experimental. On Android it only allows the upload of your dive list to two websites (divelogs.de and diveshare). On iOS it also allows local file based exports as Subsurface specific XML files (both for dives and dive sites) as well as UDDF.
Tapping on Next opens an additional page for login information for the destination website (or a file selection dialog).
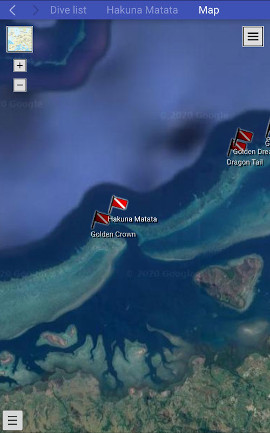
12. Viewing the locations of all dives in the dive list
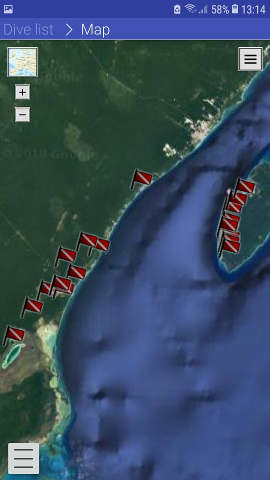
The locations of all dives in the dive list can be viewed from the Location menu by selecting the Map option. A satellite image of the world is shown. At that scale no dive sites are shown. If you zoom into a particular region of the world the dive sites appear, indicated by red flags. Zooming in even closer indicates the names of each of the different dive sites.
13. Specifying the settings for Subsurface-mobile
The Settings page allows the customization of Subsurface-mobile. It is grouped into four sections. Many of the settings involve dragging a slider switch to activate or deactivate a particular setting.
13.1. General settings section
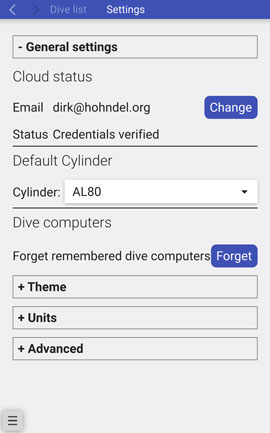
13.1.1. Cloud status: Changing to a different Subsurface cloud account
Some users have more than one Subsurface cloud account and need to switch between accounts. Tap on the Change button next to the Email address in the General settings on the Settings page (see image above). This opens the Cloud credentials page. Here you can change the email address and password used and then tap the button Sign-in or register. The dive list of the newly-opened account is shown.
13.1.2. Default cylinder
When manually entering a dive or when downloading from a dive computer that doesn’t explicitly include cylinder size information (very few dive computers support that feature), Subsurface-mobile uses the cylinder that you select here as the default, useful for divers that mostly use a particular type of cylinder. If you don’t set this entry, no default cylinder is used.
13.1.3. Forget the remembered dive computers used during dive download
Tap the Forget button to reset the dive computers that are stored in the shortcut buttons on the Download from dive computer page.
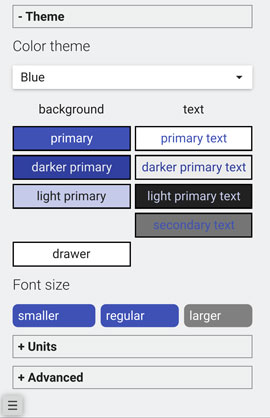
13.2. Theme section
13.2.1. Color theme
|
Besides the default blue color scheme, Subsurface-mobile supports two additional color schemes for users with different tastes (see image on left). All screenshots shown in this user manual are based on the blue default color scheme. You can pick the pink or dark color theme from the drop down menu. The boxes in the image on the left show the various color choices in the theme of your choice. |
13.2.2. Font size
Depending on the size and the screen resolution of your mobile device, you may prefer slightly smaller or slightly larger fonts. You can make this selection with the three buttons here.
13.3. Units section
Here you can pick metric, imperial, or personalized units for the user interface. In most cases Subsurface-mobile should pick the regionally typical unit system for your location.
13.4. Advanced section
As the name indicates, most users do not need to make changes here.
13.4.1. Bluetooth
Since most mobile devices tend to find a LOT of BT/BLE devices that aren’t dive computers, by default Subsurface-mobile only shows known dive computers to make the connection list easier to use.
This setting tells Subsurface-mobile to temporarily show ALL Bluetooth and BLE devices as possible connections on the Download Page, not just the ones recognized as dive computers. If you end up needing this option in order to select a dive computer that is not recognized by Subsurface-mobile, please send an email to the developers (using the Help → Ask for support menu entry) so we can add the missing code to recognize your dive computer as well.
13.4.2. Display
Subsurface-mobile tries to make efficient use of the available screen real estate of your mobile device. In most cases this leads to reasonable choices regarding the number of parallel columns that are being displayed. Some users have expressed the desire to force Subsurface-mobile to show only one column in portrait mode, even on large devices like tablets, as this results in a larger profile on the Dive Details page. Select this option if you want to enable that feature.
13.4.3. Activating the Developer sub-menu
This enables an additional menu item in the Main menu which contains options which are almost never useful for a regular user. Here you can find the detailed app log file as well as several test screens that help the developers track down issues you might encounter.
14. Help
14.1. About
This page shows you the exact version of Subsurface-mobile that you are running and provides a convenient way to copy the application logs to the clipboard.
14.2. Show user manual
This menu entry opens the online version of this user manual in the native browser of your device. Unfortunately this option is not available without Internet access.
14.3. Ask for support
This item opens your default email client with a pre-populated email to the Subsurface support alias and copies the app logs into that email. Simply add your question or the but that you are reporting and send us your message.
14.4. Reset forgotten Subsurface Cloud password
As mentioned earlier in this manual, this is a convenient link to a web page that allows you to reset the password for your Subsurface Cloud account.